

Destiny 2 Safe Passage Ability
Quick Links
- What Are Variable Ability Cooldowns?
- Passive And Active Super Regeneration
- Other Means Of Gaining Super Free energy
- All Grenade Cooldowns
- All Melee Cooldowns
- All Class Ability Cooldowns
- All Super Cooldowns
Destiny two has seen a radical rework of its ability cooldown system since the Bungie 30th Anniversary Pack. Abilities at present have unique cooldowns, Super energy received an overhaul, and many abilities had their cooldowns tweaked.
If yous haven't played Destiny 2 recently, this can be a shock to come dorsum to. And for veteran players, figuring out exact ability cooldowns can exist a pain. This guide covers how ability cooldowns work in Destiny 2, explains what Super tiers and active Super generation methods are, and nosotros encompass every single ability cooldown in the game. Use the table of contents above to jump to whatsoever department that interests you.
Updated April 28th, 2022, by Charles Burgar: With the constant balance tweaks to ability cooldowns and Super tiers, we've added a section to this guide that showcases every ability cooldown in the game—including an ability'due south cooldown at each stat tier. Beyond that, nosotros've likewise overhauled the kickoff one-half of this article to better explain how variable power cooldowns piece of work, what Super tiers are, and better explain how Destiny 2'due south complicated Super energy system works.
What Are Variable Ability Cooldowns?
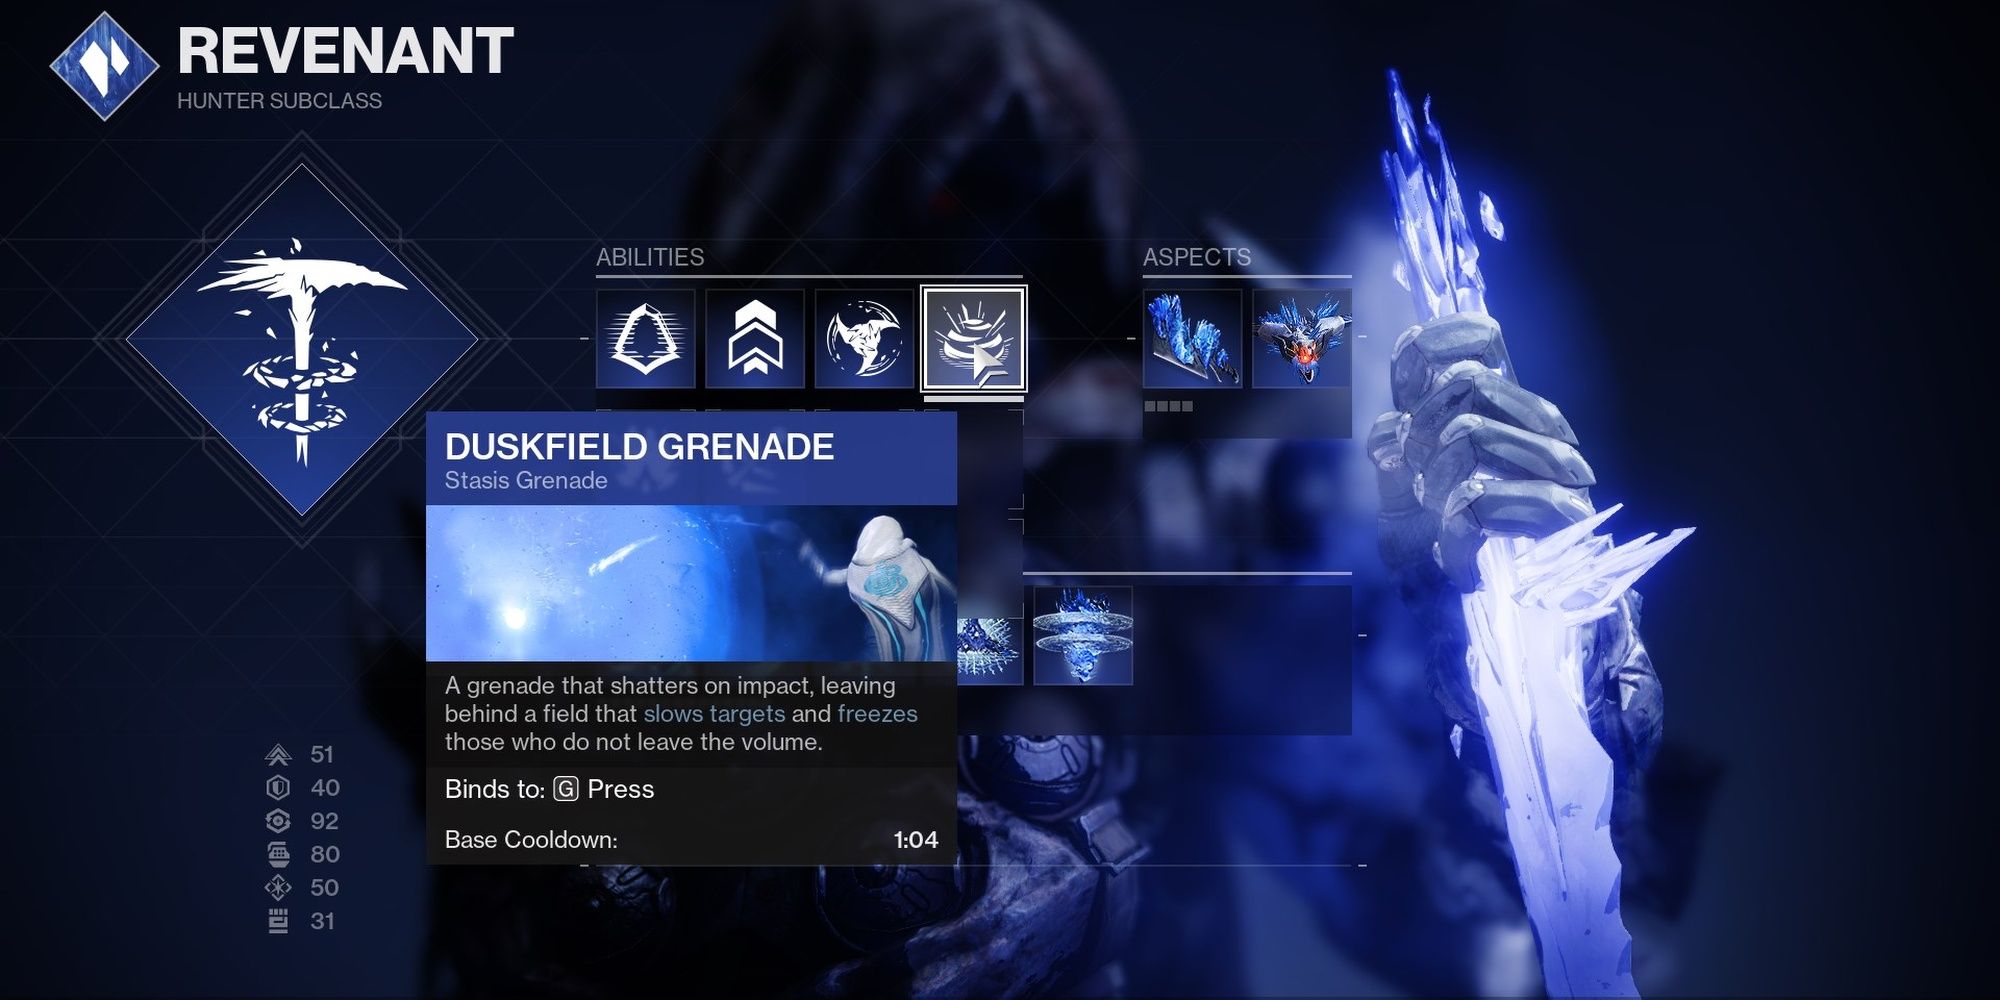
Destiny 2's abilities each have a unique cooldown that Bungie refers to as the variable ability cooldown system. In essence, Bungie tin tweak the cooldowns of each power in Destiny 2 without impacting the cooldown of like abilities, something that was incommunicable earlier the Bungie 30th Anniversary Pack was released.
Each grenade, melee ability, course ability, and Super has a unique cooldown. For case, Duskfield Grenades recharge in i:04 minutes while Glacier Grenades accept 2:32 minutes to charge. Both grenades have different cooldowns despite being a part of the same subclass. While abilities have differing cooldowns, almost abilities tend to fall under certain cooldown bands that Bungie refers to every bit tiers.
Ability And Super Tiers Explained
You might have heard some community members or developers refer to some abilities as a "T3" or "T4" ability, but what does that mean? But put, t iers refer to a choice of abilities that all share the same base cooldown and active Super regeneration scalars (explained in the next section). The college the ability tier, the shorter the cooldown.
For example, the shortest base Super cooldown is half-dozen:57. This cooldown is shared between the Warlock's Well of Radiance Super (Solar) and the Titan's Ward of Dawn Super (Void). T5 refers to abilities with the fastest cooldowns in the game, so Well of Radiance and Ward of Dawn are both considered T5 Supers. If Bungie decided to nerf their base cooldowns, they'd move them to T4 or T3, sharing the same base cooldown as any Supers in that tier. This organization too impacts how much Super energy you lot go while in combat, but nosotros'll embrace that in the side by side department; information technology's very complicated.
This terminology is only used outside of the game in This Week at Bungie posts, patch notes, or community-made videos, so don't worry about base of operations cooldown tiers if yous're a newcomer or returning to the game. But know that non all abilities have the same cooldown rate.
This tier differentiation between power cooldowns is not referring to your Discipline, Intellect, or Strength tiers. You lot can have T10 Bailiwick for a slow charging grenade or T1 Intellect for the fastest charging Super in the game. Bungie solely used this terminology to clump base cooldown bands together.
Render to Quick Links
Passive And Agile Super Regeneration
If you're a returning Destiny 2 player, Super free energy received an overhaul in the Bungie 30th Anniversary Pack. Supers have passive and agile regeneration sources, regardless of build. Permit's break that downwardly:
- Passive Regeneration: A Super's base cooldown rate.
- Modified by the Intellect stat.
- Active Regeneration: Killing enemies, dealing damage, and taking damage charges your Super faster.
- Modified by weapon perks, armor mods, and how much damage is being dealt/taken.
Every Super in Destiny ii will passively charge over a lengthy period. This passive rate tin can be accelerated by increasing the Intellect stat through certain armor pieces, mods, and bracket Fragments. Agile regeneration is much more than involved. In essence, the more active you are in combat, the faster you'll get your Super. Killing enemies and actively taking impairment volition charge your Super much faster, regardless of your Intellect stat or general build.
Agile Super Regeneration Explained
All sources of damage from your Guardian volition grant a small chunk of Super energy. The amount of energy gained depends on a few factors:
- The damage inflicted
- The weapon type used to inflict said impairment (Principal, Special, Heavy)
- The charge per unit at which you impairment the target
- The enemy damaged
- Your Super's cooldown tier (not your Intellect)
Intellect has no impact on the amount of Super energy gained from damaging enemies or taking damage.
Dealing Damage
The most important factor is your weapon type, both for PvE and PvP. Master weapons give the almost Super energy per harm dealt, with Specials and Heavies granting around half equally much. For example, dealing 41,200 damage with an Machine Rifle will give near 4% of your Super, assuming you're using a T5 Super (we'll come up back to how tiers bear on free energy gained in a 2nd). If you used a Special or Heavy weapon and dealt the same amount of impairment, you lot'd become about 2% Super energy instead. Overkill impairment does not grant additional Super energy.
Super energy scalars are dissimilar in PvP, but the concept is the same. As shown in Castle Content's YouTube video analyzing this topic, dealing 265 Primary damage against an enemy Guardian will grant ii.3% of your Super, the aforementioned equally killing a Guardian. You'd have to deal 440 damage with a Special weapon to get the same amount as your Master. In PvP, Specials give about 40% less Super energy than Primaries, Heavy weapons presumably giving even less. This is regardless of your Super's cooldown tier.
With that said, it's important to note that Special and Heavy weapons have far better DPS than Primaries. PvE players tin main a Auto Gun or Fusion Rifle and receive the same Super returns per second, potentially more, as if they used a Primary. The conversion charge per unit of damage to Super might be less efficient on Specials and Heavies, yet that'southward counteracted by their far better DPS values in PvE. For PvP, this scalar highly rewards players for using their Primary in duels, granting far less energy if yous slay out with your Special.
If you'd like a more thorough breakdown of this organization for PvP, we recommend watching Castle Content's YouTube video on how Super cooldowns work.
Return to Quick Links
Taking Damage
Fortunately, the correlation between Super energy and damage received is much simpler. The magnitude of damage you lot receive determines how much Super energy yous become. The harder the striking is, the more energy yous'll get. Small hits, such as a Thrall's melee attack, give a sliver of Super energy (0.25% or and so). Harder-hitting attacks scale to effectually 0.5% or one% of your Super.
In the Crucible, you also gain Super free energy for taking harm—albeit at a reduced rate. You gain energy equal to 67% of the damage you lot took from enemy Guardians. For instance, if you took 600 damage with a T1 Super, yous'd gain Super free energy equal to dealing 400 Primary damage yourself (about 2.three%).
With that said, overshields completely disable this mechanic. If you accept whatever overshields agile—even a sliver from Whisper of Rime—you won't gain any Super energy from taking harm. Should your overshield break from enemy fire, y'all'll need to wait for your shields to fully recharge before this mechanic works again. Having your overshield dissipate without taking excess damage will re-enable Super gains from damage received. This overshield caveat is nowadays in all activities, not just PvP.
Render to Quick Links
Super Cooldown Tiers
If things weren't complicated enough, your Super's cooldown tier as well impacts how much energy yous receive from dealing and receiving damage. The higher your Super's cooldown tier is, the more than free energy you'll receive from dealing and taking harm. Bonus energy received from higher tier Supers is also afflicted by the Special and Heavy free energy scalars we talked almost earlier, simply hither'due south a rough rundown of the bonus energy you tin can expect from each tier. Values for this tabular array are based on Castle Content's findings.
Values are for Main weapons. Special and Heavy weapons gain a smaller bonus due to their Super energy scalars.
| Super Tier | Super Free energy Bonus |
|---|---|
| Tier 1 | 0% |
| Tier 2 | 12.5% |
| Tier 3 | 17.v% |
| Tier 4 | 27.5% |
| Tier 5 | 33.75% |
Return to Quick Links
Other Ways Of Gaining Super Energy
Dealing and taking damage aren't your simply ii ways of earning Super energy. In that location are a few more Super energy sources that are worth mentioning:
- Killing enemies
- Picking up Orbs of Power
- Using certain weapon perks (notably Thresh)
Defeating enemies in Destiny ii—both in PvE and PvP—will grant a clamper of Super energy. PvE values seem to remain consistent from Shadowkeep, although PvP values have been adjusted with the Bungie 30th Ceremony Pack. The tabular array below showcases rough approximations of how much energy you'll receive from kills and assists.
| Kills | Assists | |
|---|---|---|
| Small-scale | 0.6% | 0.3% |
| Elite | 0.96% | 0.48% |
| Mini-Boss | i.8% | 0.9% |
| Boss | 3% | 1.5% |
| Enemy Guardian | ~2.3% | ~one.1% |
Beyond kills, you tin can also earn more than Super energy from Orbs of Power, sure weapon perks, and armor mods. Credit to Low-cal.gg for many of the values listed below:
| Orbs Of Power | |
|---|---|
| Source | Super Energy |
Orbs of Power(Mods) | 2.5% |
Orbs of Power(Super) | vii.143% |
| Perks | |
|---|---|
| Source | Super Energy |
| Thresh | 1% |
Thresh(Special, PvE) | 1.five% |
| Enhanced Thresh | 1.33% |
Enhanced Thresh(Special, PvE) | 2% |
| Armor Mods (On Kill) | ||
|---|---|---|
| Enemy Type | Ashes To Avails | Hands-On |
| Minor | two.3% | 1.31% |
| Elite | 4% | 2.44% |
| Mini-Boss | 7.vii% | iv.65% |
| Boss | 13% | 8% |
| Enemy Guardian | half-dozen.5% | 0% |
| Armor Mod (Dynamo) | |
|---|---|
| Hunter | 2.5% |
| Titan | three% |
| Warlock | five% |
| Armor Mod (Free energy Converter) | |
|---|---|
| Ane CwL Stack | five% |
| 2 CwL Stacks | 10% |
| Three CwL Stacks | 15% |
| Four CwL Stacks | xx% |
| Five CwL Stacks | xl% |
*CwL is brusk for "Charged with Light."
Amor mods can be stacked twice to increase their energy returns. Stacking the same armor mod iii times via Artifice Armor will not grant boosted energy.
- Ashes to Assets x2: 12.5% more effective.
- Easily-On x2: ~25% more effective.
- Dynamo x2: lx% more constructive.
Return to Quick Links
All Grenade Cooldowns
Base Cooldowns (Tier three Discipline)
| Arc | Solar | ||
|---|---|---|---|
| Flashbang | 1:31 | Firebolt | 1:04 |
| Tempest | ane:31 | Fusion | 1:13 |
| Pulse | 1:45 | Swarm | 1:31 |
| Skip | i:45 | Tripmine | 1:31 |
| Arcbolt | two:01 | Thermite | 1:45 |
| Lightning | two:01 | Solar | ane:45 |
| Flux | 3:02 | Incendiary | ii:01 |
| Void | Stasis | ||
| Axiom | ii:32 | Duskfield | ane:04 |
| Scatter | i:45 | Coldsnap | 2:01 |
| Spike | 1:45 | Glacier | 2:32 |
| Voidwall | 1:45 | ||
| Vortex | 1:45 | ||
| Magnetic | two:01 | ||
| Suppressor | 2:01 | ||
Grenade Tiers
For mobile users and general readability, we're going to clump most grenade cooldowns into tiers, similar to how Supers work. Some grenades autumn outside these cooldowns, which are listed in a separate table. Tiers referenced in the Bailiwick cooldowns tabular array refer to these grenades.
| Grenade Tiers | ||
|---|---|---|
| Tier | Base Cooldown | Grenades |
| Tier five | 1:04 | Duskfield, Firebolt |
| Tier four | 1:31 | Flashbang, Storm, Swarm, Tripmine |
| Tier 3 | ane:45 | Pulse, Skip, Solar, Spike, Thermite, Void Wall, Vortex |
| Tier ii | 2:01 | Arcbolt, Coldsnap, Incendiary, Lightning, Magnetic, Scatter, Suppressor |
| Tier 1 | 2:32 | Axiom, Duskfield (Renewal Grasps), Glacier |
| Unique Grenade Cooldowns | |
|---|---|
| Grenade | Cooldown |
| Flux | three:02 |
| Fusion | 1:thirteen |
Discipline Cooldowns
| Grenade Subject area Cooldowns (By Tier) | |||||
|---|---|---|---|---|---|
Tier (Row)Subject field (Column) | Tier 5 | Tier iv | Tier three | Tier 2 | Tier ane |
| T0 Discipline | 1:20 | ane:54 | two:11 | two:32 | three:09 |
| T1 Subject | i:12 | i:43 | 1:59 | 2:18 | 2:52 |
| T2 Field of study | 1:06 | ane:35 | 1:49 | 2:06 | 2:38 |
| T3 Discipline | 1:04 | ane:31 | ane:45 | two:01 | 2:32 |
| T4 Field of study | 0:53 | 1:16 | 1:27 | 1:41 | two:06 |
| T5 Field of study | 0:45 | i:05 | i:15 | one:27 | 1:48 |
| T6 Discipline | 0:40 | 0:57 | one:05 | 1:sixteen | one:35 |
| T7 Discipline | 0:35 | 0:51 | 0:58 | 1:07 | 1:24 |
| T8 Discipline | 0:32 | 0:45 | 0:52 | 1:01 | 1:sixteen |
| T9 Discipline | 0:29 | 0:41 | 0:48 | 0:55 | 1:09 |
| T10 Discipline | 0:24 | 0:35 | 0:40 | 0:47 | 0:58 |
| Grenade Discipline Cooldowns (Outliers) | ||
|---|---|---|
Tier (Row)Discipline (Column) | Fusion | Flux |
| T0 Discipline | 1:31 | 3:47 |
| T1 Discipline | 1:23 | 3:27 |
| T2 Discipline | 1:16 | three:09 |
| T3 Discipline | i:13 | iii:02 |
| T4 Discipline | 1:01 | 2:32 |
| T5 Discipline | 0:52 | 2:10 |
| T6 Subject | 0:45 | 1:54 |
| T7 Subject | 0:40 | 1:41 |
| T8 Bailiwick | 0:36 | ane:31 |
| T9 Discipline | 0:33 | 1:23 |
| T10 Bailiwick | 0:28 | ane:10 |
Return to Quick Links
All Melee Cooldowns
Base Cooldowns (T3 Strength)
| Hunter | ||
|---|---|---|
| Subclass | Melee Ability | Cooldown |
| Arc | Combination Blow | 0:xv |
| Storm Strike | ane:40 | |
| Disorienting Blow | 1:40 | |
| Solar | Proximity Throwing Pocketknife | 1:40 |
| Knife Trick | 1:22 | |
| Weighted Knife | 1:49 | |
| Void | Snare Bomb | 1:xxx |
| Stasis | Withering Bract | 1:53 |
| Titan | ||
|---|---|---|
| Bracket | Melee Ability | Cooldown |
| Arc | Seismic Strike | 1:thirty |
| Ballistic Slam | 1:30 | |
| Frontal Assault | one:46 | |
| Solar | Hammer Strike | ane:xxx |
| Throwing Hammer | ane:thirty | |
| Mortar Blast | ane:22 | |
| Void | Shield Bash | 1:30 |
| Shield Throw | 1:xl | |
| Stasis | Shiver Strike | one:53 |
| Warlock | ||
|---|---|---|
| Subclass | Melee Ability | Cooldown |
| Arc | Chain Lightning | 1:30 |
| Ball Lightning | ane:53 | |
| Rising Storm | one:30 | |
| Solar | Celestial Burn | i:40 |
| Guiding Flame | one:30 | |
| Igniting Touch | 1:30 | |
| Void | Pocket Singularity | 1:thirty |
| Stasis | Penumbral Boom | 1:53 |
Melee Ability Tiers
To make this commodity and the Forcefulness cooldowns table easier to read, we're going to clump most melee abilities into tiers. Melee abilities with unique cooldowns are listed in a dissever table. The Strength cooldowns table refers to these abilities with each tier column:
| Melee Power Tiers | |
|---|---|
| Tier 4 (one:22) | |
| Hunter | Knife Trick |
| Titan | Mortar Smash |
| Warlock | N/A |
| Tier 3 (ane:30) | |
| Hunter | Snare Bomb |
| Titan | Seismic Strike, Ballistic Slam, Throwing Hammer, Shield Bash |
| Warlock | Chain Lightning, Rising Tempest, Guiding Flame, Igniting Touch, Pocket Singularity |
| Tier 2 (1:forty) | |
| Hunter | Tempest Strike, Disorienting Accident, Proximity Throwing Knife |
| Titan | Shield Throw |
| Warlock | Celestial Burn |
| Tier ane (one:53) | |
| Hunter | Withering Bract |
| Titan | Shiver Strike |
| Warlock | Penumbral Boom |
| Unique Melee Cooldowns | |
|---|---|
| Melee | Cooldown |
| Weighted Knife | 1:49 |
| Frontal Assail | i:46 |
| Combination Blow | 0:15 |
Strength Cooldowns
| Melee Force Cooldowns (By Tier) | ||||
|---|---|---|---|---|
Tier (Row)Strength (Cavalcade) | Tier iv | Tier 3 | Tier two | Tier 1 |
| T0 Force | one:43 | 1:53 | 2:05 | 2:21 |
| T1 Strength | 1:33 | ane:43 | 1:54 | 2:08 |
| T2 Strength | i:25 | 1:34 | 1:44 | 1:57 |
| T3 Strength | one:22 | 1:30 | 1:forty | 1:53 |
| T4 Strength | 1:08 | i:15 | ane:24 | 1:34 |
| T5 Forcefulness | 0:59 | i:04 | i:12 | i:21 |
| T6 Strength | 0:51 | 0:56 | 1:03 | 1:ten |
| T7 Strength | 0:46 | 0:50 | 0:56 | ane:03 |
| T8 Forcefulness | 0:41 | 0:45 | 0:l | 0:56 |
| T9 Force | 0:37 | 0:41 | 0:46 | 0:51 |
| T10 Strength | 0:32 | 0:35 | 0:39 | 0:43 |
| Melee Strength Cooldowns (Outliers) | |||
|---|---|---|---|
Tier (Row)Forcefulness (Column) | Combination Blow | Frontal Assault | Weighted Knife |
| T0 Strength | 0:19 | 2:13 | two:16 |
| T1 Force | 0:17 | two:01 | 2:03 |
| T2 Force | 0:16 | 1:51 | one:53 |
| T3 Strength | 0:xv | 1:46 | ane:49 |
| T4 Strength | 0:13 | 1:28 | 1:31 |
| T5 Strength | 0:11 | 1:16 | 1:18 |
| T6 Strength | 0:09 | 1:06 | 1:08 |
| T7 Strength | 0:08 | 0:59 | 1:00 |
| T8 Strength | 0:08 | 0:53 | 0:54 |
| T9 Force | 0:07 | 0:48 | 0:49 |
| T10 Forcefulness | 0:06 | 0:41 | 0:42 |
Render to Quick Links
All Class Ability Cooldowns

Base of operations Cooldowns (T3 Mobility, Resilience, Recovery)
| Hunter (Mobility) | |
|---|---|
| Marksman'southward Dodge | 0:29 |
| Gambler's Contrivance | 0:38 |
| Titan (Resilience) | |
|---|---|
| Rally Barricade | 0:32 |
| Towering Barricade | 0:40 |
| Warlock (Recovery) | |
|---|---|
| Empowering Rift | ane:22 |
| Healing Rift | i:22 |
Class Ability Cooldowns
Barricades created with Sentinel'due south Bastion Aspect have the same cooldown every bit Warlock Rifts.
Mask of Bakris uses the Marksman's Dodge cooldown with a ten-2nd filibuster, even if you lot're using Gambler'south Dodge.
| Stat Tier | Markman's Dodge(Hunter) | Gambler's Dodge(Hunter) | Rallying Barricade(Titan) | Towering Barricade(Titan) | Rifts(Warlock) |
|---|---|---|---|---|---|
| T0 | 0:34 | 0:45 | 0:46 | 0:57 | i:57 |
| T1 | 0:32 | 0:42 | 0:xl | 0:50 | one:43 |
| T2 | 0:30 | 0:twoscore | 0:36 | 0:44 | 1:31 |
| T3 | 0:29 | 0:38 | 0:32 | 0:40 | i:22 |
| T4 | 0:26 | 0:35 | 0:29 | 0:36 | i:15 |
| T5 | 0:24 | 0:32 | 0:26 | 0:33 | 1:08 |
| T6 | 0:22 | 0:29 | 0:24 | 0:30 | 1:03 |
| T7 | 0:nineteen | 0:25 | 0:21 | 0:26 | 0:59 |
| T8 | 0:16 | 0:22 | 0:18 | 0:22 | 0:51 |
| T9 | 0:xv | 0:20 | 0:15 | 0:nineteen | 0:46 |
| T10 | 0:14 | 0:xviii | 0:13 | 0:16 | 0:41 |
Return to Quick Links
All Super Cooldowns
Base Cooldowns (T3 Intellect)
| Tier 5 (Fastest Cooldown) | |
|---|---|
| Ward of Dawn | vi:57 |
| Well of Radiance | 6:57 |
| Tier 4 | |
| Blade Barrage | 7:35 |
| Shadowshot: Ambush | vii:35 |
| Silence And Squall | 7:35 |
| Tier 3 | |
| Burning Maul | 8:20 |
| Nova Bomb: Cataclysm | viii:twenty |
| Nova Bomb: Vortex | eight:xx |
| Shadowshot: Moebius Quiver | 8:20 |
| Thundercrash | 8:20 |
| Tier 2 | |
| Arc Staff | ix:16 |
| Chaos Reach | nine:16 |
| Gilt Gun | 9:16 |
| Glacial Quake | nine:16 |
| Fists Of Havoc | 9:16 |
| Nova Warp | 9:sixteen |
| Lookout man Shield | 9:sixteen |
| Stormtrance | 9:16 |
| Winter'south Wrath | 9:16 |
| Tier 1 (Slowest Cooldown) | |
| Daybreak | 10:25 |
| Hammer Of Sol | x:25 |
| Spectral Blades | x:25 |
Intellect Cooldowns
Tier (Row)Intellect (Column) | Tier 5 | Tier 4 | Tier 3 | Tier 2 | Tier 1 |
|---|---|---|---|---|---|
| T0 Intellect | 10:00 | 10:55 | 12:00 | 13:21 | xv:01 |
| T1 Intellect | viii:51 | 9:40 | ten:38 | 11:49 | 13:17 |
| T2 Intellect | seven:57 | 8:forty | 9:32 | 10:36 | 11:55 |
| T3 Intellect | 6:57 | 7:35 | 8:20 | 9:16 | x:25 |
| T4 Intellect | 6:35 | 7:11 | 7:54 | 8:47 | nine:53 |
| T5 Intellect | 6:sixteen | 6:fifty | vii:31 | viii:21 | 9:24 |
| T6 Intellect | 5:59 | 6:31 | 7:10 | 7:58 | 8:58 |
| T7 Intellect | 5:43 | 6:14 | six:51 | 7:37 | 8:34 |
| T8 Intellect | 5:33 | 6:03 | vi:39 | vii:24 | 8:xix |
| T9 Intellect | 5:23 | 5:53 | 6:28 | 7:11 | 8:05 |
| T10 Intellect | 5:nineteen | five:48 | vi:23 | 7:05 | 7:59 |
Return to Quick Links

Destiny 2 Safe Passage Ability,
Source: https://www.thegamer.com/destiny-2-ability-super-cooldowns-explained/
Posted by: forsmanmoren1988.blogspot.com
0 Response to "Destiny 2 Safe Passage Ability"
Post a Comment